Anycast DNS Using OSPF

The fourth article in our Anycast DNS series covers Anycast DNS using Open Shortest Path First or OSPF routing protocol.
OSPF is a dynamic routing protocol used to build larger scale IP networks. It differs from RIP, because it is a link-state routing protocol and falls into the group of Interior Gateway Protocols that operate within a single Autonomous System or AS. OSPF is a link-state routing protocol that runs Dijkstra's algorithm to calculate the shortest path to other networks. Taking the bandwidth of the network links into account, it uses cost as its metric. OSPF works by developing adjacencies with its neighbors, periodically sending hello packets to neighbors, flooding changes to neighbors when a link's status changes, updating its neighbors of all recent link state changes every 30 minutes. The use of this algorithm makes OSPF much faster at network convergence, which is why it makes a better selection for building Anycast DNS solutions for enterprise environments.
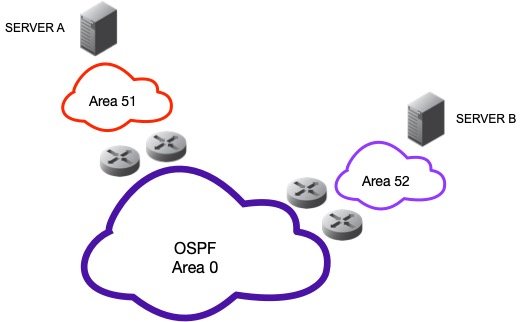
Our OSPF network will consist of a two different OSPF areas 0.0.0.51 and 0.0.0.52 that are connected to a thrid area, backbone area 0.0.0.0. This is shown in the figure below:

Each router, will have one interface directly connected to backbone area 0.0.0.0. Their other interface(s) will connect into their own respective OSPF routing areas. We do not dive into the details of OSPF networking because it is beyond the scope of this article. Our goal is to provide a working recipe for using OSPF, Cisco routers, and Quagga Open Source host-based routing software.
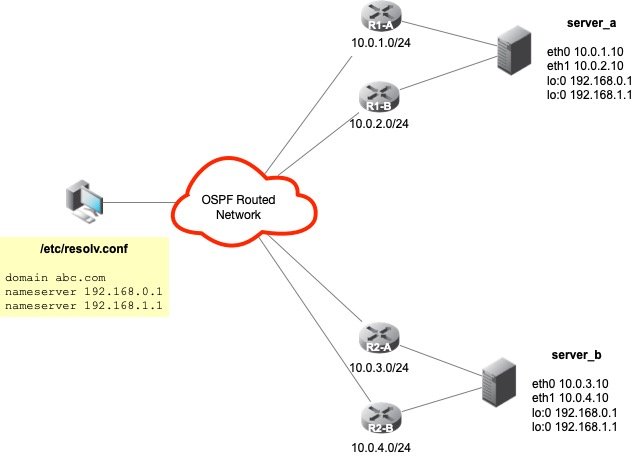
Our recipe calls for configuring two Anycast DNS servers each with two physical network connections on different subnets. In addition, two upstream neighbor routers are configured with OSPF routing. Our Anycast DNS servers will be configured with OSPF routing protocol for originating our two Anycast VIPs of 192.168.0.1/32 and 192.168.1.1/32. Our configuration is shown in the graphic below:

NOTE: we could advertise two Anycast VIPs from the same netblock 192.168.0.0/24 such as 192.168.0.1/32 and 192.168.0.2/32 to save address space, but we're simply trying to show the different VIPs on different netblocks in this case through example.
Recipe - Multihomed Anycast DNS using OSPF
Step 1 - Configure Anycast VIPs On Server A
Add two Anycast VIPs to the host's loopback device as a virtual loopback device or sub-interface.
ifconfig lo:0 192.168.0.1 netmask 255.255.255.255
ifconfig lo:1 192.168.1.1 netmask 255.255.255.255
NOTE: on Sun Solaris the loopback device is named slightly different: lo0:0 and lo0:1.
Step 2 - Configure Zebra (part of Quagga) On Server A
The typical location of the zebra configuration file is /etc/quagga/zebra.conf, unless you have built Quagga with non-default file locations. Create the /etc/quagga/zebra.conf file as follows:
!
! Zebra configuration saved from vty
!   2009/06/07 09:49:00
!
hostname server_a
!
password zebra
enable password zebra
!
interface eth0
 ip address 10.0.1.10/24
!
interface eth1
 ip address 10.0.2.10/24
!
interface lo
!
line vty
!
Start the zebra process and configure it to start automatically at boot time. With zebra running, we can access the running configuration interactively by using vty or vtysh. Please consult the Quagga on-line help for usage at http://www.quagga.net
Step 3 - Configure OSPF On Server A
To configure OSPF routing on Server A, we need to configure the server to run ospfd, the OSPF routing engine of Quagga. This is done by creating and editing the /etc/quagga/ospfd.conf file as follows:
! ospfd.conf file
hostname server_a
password Passw0rd!
!
interface eth0
!
interface eth1
!
interface lo
!
router ospf
 ospf router-id 10.0.1.10
 log-adjacency-changes
 redistribute connected
 network 10.0.1.0/24 area 0.0.0.51
 network 10.0.2.0/24 area 0.0.0.51
!
line vty
Start the ospfd routing daemon and make sure it is configured to start automatically at boot time. Similar to zebra, the OSPF process can be maintained and configured by using the vty or vtysh. The only interfaces in our configuration that are actively participating using OSPF are eth0 and eth1. They will create an adjacency with their respective upstream OSPF neighbor. The eth0 will create an adjacency with router R1-A, and the eth1 interface will create its adjacency with router R1-B. In this configuration, the Anycast VIPs are routes that are redistributed because of the "redistribute connected" command. We don't need these VIPs to be defined as OSPF interfaces per se.
Step 4 - Configure Server A Upstream Routers R1-A and R1-B with OSPF
The following Cisco configurations were applied to the upstream router R1-A:
interface FastEthernet0/0
 description link to area 0
 ip address 192.168.2.31 255.255.255.0
!
interface FastEthernet0/1
 description link to area 51
 ip address 10.0.1.1 255.255.255.0
!
router ospf 100
 log-adjacency-changes
 network 10.0.1.0 0.0.0.255 area 0.0.0.51
 network 192.168.2.0 0.0.0.255 area 0.0.0.0
Perform the same configuration on router R1-B:
interface FastEthernet0/0
 description link to area 0
 ip address 192.168.2.32 255.255.255.0
!
interface FastEthernet0/1
 description link to area 51
 ip address 10.0.2.1 255.255.255.0
!
router ospf 100
 log-adjacency-changes
 network 10.0.2.0 0.0.0.255 area 0.0.0.51
 network 192.168.2.0 0.0.0.255 area 0.0.0.0
At this point, OSPF routing should be happening, and our Anycast VIPs should be advertised.
Step 5 - Create Failover Mechanism
In the event that our DNS process on Server A or Server B fails, it is desirable to remove the Anycast VIPs from the global routing table. To do that, we must stop the origination and advertisement of those VIPs at the source. A small script can be used to accomplish this by performing cursory checks on the health of the DNS server. If the script detects issues with the ability for DNS to resolve a particular query, it will simply shutdown our routing software or remove the routes from being advertised. The following is an example of what one of these scripts would look like:
#!/bin/bash

DNSUP=`/usr/sbin/dig @192.168.0.1 localhost. A +short`
if [ "$DNSUP" != "127.0.0.1" ];
then
echo "Stopping Anycast...."
    /etc/init.d/ospfd stop
    /etc/init.d/zebra stop
    /etc/init.d/named stop
else
    echo "Everything's good... Do nothing..."
fi
This script should be scheduled to run frequently to provide minimal downtime and quick failover.
Step 6 - Repeat Steps 1-5 For Creating Server B and Router R2-A and R2-B
OSPF Troubleshooting Commands
OSPF can be a complex routing protocol to deploy, especially in large enterprise network environments. A great detail planning is required to achieve an efficient routed architecture that converges quickly. As you work through configuring OSPF, you will need to rely on a bevy of tools for troubleshooting and validating your OSPF routed network. Here are some OSPF commands that you can use when configuring and validating your OSPF network.
Viewing OSPF Neighbors
To ensure our servers are creating adjacencies properly, you should use the native commands provided on Cisco and Quagga to view OSPF neighbors.
Cisco:
R1-A# show ip ospf neighbor

NeighborID    Pri    State        Dead Time    Address    Interface
10.0.1.10       1     FULL/BDR     00:00:37     10.0.1.10  FastEthernet0/1

R1-B# show ip ospf neighbor

NeighborID    Pri    State        Dead Time    Address    Interface
10.0.2.10       1     FULL/BDR     00:00:29     10.0.2.10  FastEthernet0/1
Quagga:
vtysh -c "show ip ospf neighbors"
 Neighbor ID    PriState       Dead Time Address         Interface        RXmtL RqstL DBsmL
192.168.2.31      1Full/DR       33.073s 10.0.1.1        eth0:10.0.1.10       0    0     0
192.168.2.32      1Full/BDR      33.813s 10.0.2.1        eth1:10.0.2.10       0    0     0
If you are using Linux using Iptables, make sure you add the approrpriate rules for the firewall to permit the routers to peer as neighbors. When using the defaults, this will fail, and you will have to add the following rule to the /etc/sysconfig/iptables file to allow OSPF traffic to the Linux Server(s):
-A INPUT -s 10.0.1.1/32 --protocol ospf -j ACCEPT
-A INPUT -s 10.0.2.1/32 --protocol ospf -j ACCEPT
Restart the server or iptables to enable the new rules to the rule set.
Viewing OSPF Routing Table
You can view the routes that will be advertised by the Anycast DNS server, as well as, view the routing table from the upstream neighbor routers to ensure that OSPF routing updates are occurring.
Cisco:
R1-A#show ip route ospf
     192.168.0.0/32 is subnetted, 1 subnets
O       192.168.0.1 [110/11] via 10.0.1.10, 00:08:32, Ethernet0/0
                    [110/11] via 10.0.2.10, 00:08:32, Ethernet0/1
     192.168.1.0/32 is subnetted, 1 subnets
O       192.168.1.1 [110/11] via 10.0.1.10, 00:08:32, Ethernet0/0
                    [110/11] via 10.0.2.10, 00:08:32, Ethernet0/1
Quagga:
vtysh -c "show ip ospf routes"
============ OSPF network routing table ============
N    10.0.1.0/24           [10] area: 0.0.0.51
                           directly attached to eth0
N    10.0.2.0/24           [10] area: 0.0.0.51
                           directly attached to eth1
N IA 192.168.2.0/24        [11] area: 0.0.0.51
                           via 10.0.1.1, eth0
                           via 10.0.2.1, eth1
============ OSPF router routing table =============
R    192.168.2.31          [10] area: 0.0.0.51, ABR, ASBR
                           via 10.0.1.1, eth0
                           via 10.0.2.1, eth1
============ OSPF external routing table ===========
N E1 0.0.0.0/0             [41] tag: 100
                           via 10.0.1.1, eth0
                           via 10.0.2.1, eth1
Viewing the OSPF Database
Both the Anycast DNS servers and the upstream OSPF neighbors have the ability to display the OSPF database. The commands are summarized as follows:
Cisco:
R1-A# show ip ospf database
Quagga:
vtysh -c "show ip ospf database"
Viewing the OSPF Interfaces
Both Cisco and Quagga provide the ability to view the OSPF information configured to specific interfaces. The commands are summarized as follows:
Cisco:
R1-A# show ip ospf interface
Quagga:
vtysh -c "show ip ospf interface"
Results And Conclusion
The results of our basic configuration are based upon the use of default OSPF timers. With the default settings, Anycast DNS failover was quick and seamless in < 40 seconds depending on the failure. It should be noted that during that 40 seconds, the DNS client can still "failover" to a second preferred DNS server in its resolver configuration. This second preferred server can be another Anycast DNS address that is advertised by a completely different set of servers or it can be the second Anycast DNS VIP we configured on these servers. We'll continue this article by improving on our configuration, optimizing performance, and enhancing security with more advanced OSPF configuration options.
Series
DNS Anycast using static routes
DNS Anycast using RIP
DNS Anycast using RIP (cont)
DNS Anycast using OSPF (basic)
DNS Anycast using OSPF (advanced)
DNS Anycast using BGP
